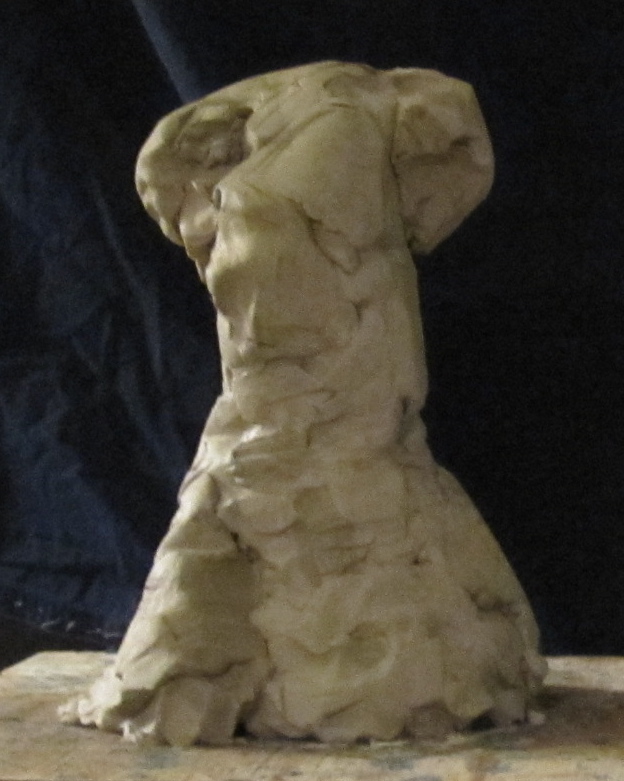
Showing posts with label sculpture. Show all posts

Monday, April 23, 2012

Hydrangea Collage

Hydrangea Collage
30 x 20
CitraSolv National Geographic on Reeves BFK
For Mixed Media.  My 3rd of 4 projects.  I used green tea to stain the paper so I didnt have a plain white surface. Then each petal, cut from the National Geographic pages, was glued to the Reeves BFK.  I only glued the centers so that I could then fold up the petals to add a 3d element.   Previous step.
A side view so you can see how the petals are folded. 
Before I folded the petals. 

Monday, January 2, 2012

DIY Frame Earring Holder


 Earring Holder
16 x13
I saw this on etsy being sold for $50 and thought "hey I could make that". I usually dont do tutorials but I thought this would be fun to share. 
The sheet of aluminum was $30 but I could use it make 6+ more holders. It is a 3ft x 3ft sheet that I bought at Lowes. 
Let me know if you make this. I would love to see your take.


Tuesday, December 13, 2011

Lady Torso

Lady Torso 
~ 2 feet
 water based clay
For Head and Figure Sculpture.  Happy with this.  I think I may even hollow it out and keep it :)  I like the marbling effect of the two clays. Previous Step.

Tuesday, December 6, 2011

Torso WIP

Torso WIP
~ 2 feet
 water based clay
For Head and Figure Sculpture.  This is more of a lump of clay then a torso.  I ran out of clay and will need to buy more to bring this to more of a finish.  2 weeks left of school! I cant do it! 

Tuesday, November 22, 2011

Lovley Lady Lumps

Lovley Lady Lumps
~ 3 feet
clay, aluminum wire, & wood
For Head and Figure Sculpture.  Finished. Previously called Standing Figure WIP.  If you recall when I began this piece I could not get My Humps by the Black Eyed Peas out of my head.  Well, as I finished I still had that song stuck in my head so I decided that that should be the title for this piece. 
 
As for the sculpture, I hate the face.  Love everything else.  After this is graded I will probably get rid of the face just to make myself feel better.  I like it more ambiguous and less in your face.   Personal style.  For this assignment though I felt I needed to include a face.  Tiny details are not my favorite part of sculpture so creating the face was pretty miserable for me.   

Tuesday, November 15, 2011

Standing Figure More WIP

Standing Figure WIP
~ 3 feet
clay, aluminum wire, & wood
For Head and Figure Sculpture.  Adding more clay to this. I worked on refining the forms and smoothing out areas. Loving the progress.  Dreading doing the face.

Tuesday, November 8, 2011

Standing Figure WIP

Standing Figure WIP
~ 3 feet
clay, aluminum wire, & wood
For Head and Figure Sculpture.  Adding more clay to this.  I love the curves.  It is nice to work from a curvy model for a change.  I have painted/drawn/sculpted enough skinny people. I also love how lose I am applying the clay.  It gives the piece more character. Its about the overall picture and not just the tiny details.
I deconstructed the Female Portrait Sculpture and the Reclining Female and repourposed the clay for this sculpture.  It is so big that I ran out of that clay and will have to buy more.  
I get more and more excited with the piece as I spend more time on it.  Lets hope that excitement continues to grow.   

Tuesday, November 1, 2011

Standing Figure WIP- Block-In

Standing Figure WIP
~ 3 feet
clay, aluminum wire, & wood
For Head and Figure Sculpture. The very beginning stages of my block in.  Previous step.
Not at all as far along with this as I would like.  I thought I had enough clay for the block in.  Turns out I dont.  Lame I know but it is what it is.  I am trying to avoid buying a bunch of clay.  When I took the Foundations sculpture course I bought 50 lbs of clay and didnt know what do do with it when the class was done.  I ended up giving it to the local elementary school when we moved.

On a side note, I had this song stuck in my head as I was working on this piece-

Tuesday, October 25, 2011

Armature- Standing Figure

Standing Figure Armature
~ 3 feet
aluminum wire & wood
For Head and Figure Sculpture.  Oh boy! This was exciting and not easy.  I did as much as I could with the materials I had. I am missing some wedges so I wasnt able to get the wires tight enough.  
I have a ton of extra wire around the feet that I think I may need to cut off. This is quite huge and goofy looking currently.  I hope it looks better when I get clay on it :)

Tuesday, October 18, 2011

Female Portrait Sculpture

Female Portrait
 ~ 12 inches
 water-based clay
 For Head and Figure Sculpture. Completed.  
it doesnt look exactly like the model but it does look like a female face so I think it is a success! :)

Sunday, October 16, 2011

Pumpkin Carving

Spidey  
~ 6 inches
  pumpkin
  Halloween pumpkin sculpture.  This is art right?? :)  We invited friends over today and did some pumpkin carving.  It was pretty fun.  I love getting my hands all gushy and mushy.  Then I love baking the pumpkin seeds when I am done.  Soo yummy.  
Here are all of our pumpkins lined up-
Mine and my husband are on the left.  Can you tell we have done this before? :) Our friends hadnt craved pumpkins since they were kids so they were a bit out of practice. 

Tuesday, October 11, 2011

Female Portrait Sculpture WIP


 Female Portrait WIP
 ~ 12 inches
 water-based clay
 For Head and Figure Sculpture.  There are a ton of imperfections in this.  It looks pretty good from this view though.
Here is the previous step-

I am taking a Leadership Class through my work and the assignment for the first week was to do a shortened version of the Myers Briggs Personality Type Indicator.  I got ENTP, which means I am- " Quick, ingenious, stimulating, alert, and outspoken. Resourceful in solving new and challenging problems. Adept at generating conceptual possibilities and then analyzing them strategically. Good at reading other people. Bored by routine, will seldom do the same thing the same way, apt to turn to one new interest after another."  I think it fits me very well.  I also had my husband take it and we are almost total opposites.  Maybe that's why we work so well :) 


Tuesday, September 27, 2011

Reclining Female

Reclining Female
~ 6in
clay
  For Head and Figure Sculpture.  Based on Rodin's Danaide. Completed. Previous step.
This was easy to do.  My Mother-in-law said it looks like she has cramps :)

Tuesday, September 20, 2011

Reclining Figure WIP

Reclining Female WIP
~ 6in
clay
  For Head and Figure Sculpture.  Based on Rodin's Danaide.  This is the basic block in.  Next week I will begin refining the forms.  

Tuesday, September 13, 2011

Viva Tequila, Figure Quick Studies, Mugz

Viva Tequila 
watercolor on paper
 12 x 9
For Still Life Painting.  Low-key subject. A tequila bottle and some money. I guess you could say it is a statement about alcohol. 
Here is the underpainting-

 oil on canvas
 For Quick Studies. 25 minute figure studies. I am a bit out of practice with oil but I still think these turned out well. 
 Also for Quick Studies.  These are 40 minute studies. 


Mugz
water based clay
For Head and Figure Sculpture. Our first assignment was to create a 1:1 mug.  Once with our own technique and one taught by the instructor. This is much harder then it looks. I redid my technique twice.  First I tried to create a coil and that didnt work.  I ended up making a cylinder and then hollowing out the center.  The instructor taught technique was much much easier. 


Saturday, September 10, 2011

Mug 1 & Asparagus Avacado Soup

 Mug 1
clay
 ~ 4 inches
 For Head and Figure Sculpture. Our first assignment it to create 2 mugs- one of our own technique and one taught to us.  I did my own technique first so I would have have the influence of the other one.  This was much harder then it looks.  When you are creating additive sculpture you are usually adding clay to a mass.  With this there was a hollow area inside making it difficult to add clay.  I ended up creating a solid cylinder and the carving the center out.  Much easier then my first try (which I scrapped) that I tried to create using a coil method.  Hopefully the next one will go smoother.  
 
On a different note, I made the most delicious soup tonight.  While reading Prevention Magazine at work today I stumbled across a recipe for Asparagus Avocado Soup.  Soo soo yummy.  I used fresh locally grown produce and it turned out so well.  If you are interested here is the recipe-
 
Asparagus Avocado Soup
Cook 8oz asparagus. 
Add to blender with 1 chopped avocado, 1 1/4 cups cold water, 1/4 cup reduced fat sour cream, and 2 Tbsp each chopped cilantro and fresh lime juice. 
Puree until smooth. 
Season to taste. 
Ladel into 4 bowls and top each with 1 Tbsp sour cream. 
Makes 3 1/4 cups

I had a bunch of asparagus so I doubled the recipe. I also didnt have any sour cream so I subed cream cheese and milk. To season I used salt, garlic powder, a little bit of pepper and extra fresh lime.

Enjoy :)

Sunday, June 12, 2011

WIP- Jessica and Baby Evelyn, Ephemeral Sculpture

Jessica and Baby Evelyn WIP
watercolor on paper
  16 x 20
As a Mother's Day present I was commissioned to do a portrait of our friends wife and baby daughter.  I begin my Summer Semester at Academy of Art very soon and I want to have this done before school starts.  This is just the first step.  I have sketched in the figures and began laying in the big color areas.  The key to this piece will be layers.  The more layers I have the deeper and more dynamic the colors will be.  

Ephemeral Sculpture

e·phem·er·al[ih-fem-er-uhl] –adjective 

1.lasting a very short time; short-lived; transitory: the ephemeral joys of childhood.
 
I have been trying to figure out what to do with my sculpture I created for Sculpture 1.  They are all pretty large and the take up too much room in my too small studio.  I have always liked the idea that art is ephemeral so I wanted to explore this idea with my sculptures.  They will now be living in my garden.  I am excited to see what happens to them over time, especially the clay as it is self-hardening clay and has not been fired.  If anything super interesting happens I will post it here. 


Questions: What do you think of the idea of ephemeral art?  Are you excited for summer??

Saturday, May 21, 2011

FINALS- Sculpture- Scream, Beautiful Dragon-Like Honeybee, Whale Tail, Coral

Scream
painted clay
 ~12 inches tall
 Continuing with my first project for Sculpture 1.  I added a little bit or red to the cheeks and ears and darkened the shirt.  
Scream was created from Amaco Self Hardening gray and white clay.  An additive technique was used to build up the forms of the sculpture.  The texture was created through the natural building and molding of the clay with my hands and with the tools. The size is just about life-size and the contrast is created from the deeper areas of the face and through the use of color.  The colors and expression were inspired from Edvard Munch's painting The Scream.        The eye is drawn through the piece by the line of the shirt. Also by the details that surround the piece like the ears on the sides of the head and the facial features.

The intention of Scream was to create a life size 3 dimensional portrait of Edvard Munch's The Scream.  My goal was to capture the facial expression but to make it more true to life.
I feel the strength is in the subtle and transparent colors.  Some of the modeling of the facial features could have been done better but as a whole the piece has a good consistent style.  If I was to redo this piece I would probably go a bit more abstract with it and stay more true to my inspiration.  I would elongate the forms more to give it more emotion.  Overall I think it is a successful piece.

Beautiful Dragon Like Honeybee
 bronze
 ~ 8 inches
 For Sculpture 1.  Beautiful Dragon-Like Honeybee is made out of bronze.  To create this piece I first sculpted my idea out of wax.  That sculpture was then sent to a foundry to be cast into bronze. My main tool for creating the wax sculpture was my hands.  I loved playing with and molding the wax.  The smaller details were done with pointed tools.  The color was created by dipping the sculpture into a cold patina (Liver of Sulfer) bath.  Once I achieved the darkness I desired I wiped off excess patina to create highlights.  The size is larger then life and the contrast if from the dark areas of the patina and the light areas of the highlights. 
The eye is drawn through and around the piece by all of the different lines.  There are the stamens in the center that bring the eye into the flower and then the petals that originate from the center and grow out and curl under.  The presence of the Dragon-Like Honeybee give the eye a place to rest and also creates an area of interest.

The intention of the piece is to bring to life an abstract idea.  Dragon-Like Honeybees do not exist so I created one.  Then I wanted to give the bee a setting and to tie in the word "beautiful" so I created a flower for him to rest on.  This piece is meant to be beautiful but odd.
I think the strengths are in the forms of the flower.  The stamens turned out well and I love the texture on the petals.  The bee could use a little work.  The legs nor the wings cast the way I would have liked but I do believe there in beauty in those imperfections.  Next time I would maybe not included the bee or spend more time working out the structure of his wings and legs.

 Whale Tail
clay
 ~ 12 inches
The sculpture Whale Tail was created from Amaco Self Hardening Clay. The main tool used to build this sculpture was my hands. The scale is much smaller then life size.  The texture was created through the way I applied the color.  The color was created through a series of poured washes.  The splatters were a way to add contrast to all of the drips. Contrast is also in the lights and the darks of the color.
The eye is drawn through the piece but the color drips and the lines of the tail.  The backbone juts up into the piece and the the fins move out from there.

The intention of the piece was to create a visual representation of a poem I wrote about my husbands and my courtship, our personal myth.  In that poem I describe the place where our friendship became love and wanted to represent that place through sculpture. 
I think the strength is in the painting.  I love the different layers of color and how they create movement.  A weakness would be the fins and how fragile they are.  They broke on me 4 different times.  Next time I would probably try to make the fins thicker so that they would not break so easily.

Coral
plaster carving
approx 10 inches
Coral is an abstracted idea of what coral is created from plaster. The tools used were a hammer, a chisel, a surform, a metal scraper, a dremel tool, and a power drill.  The texture of the piece is smooth on the "front" and textured on the "back."  This texture was created but taking a pointed tool and dragging it across the surface. There is also the texture if the holes that was created by drilling into the sculpture.  The process began with a block of plaster and then I used a subtractive technique to chisel away at the plaster to create my desired form.  The color is the white of the plaster with a little bit of yellow dye mixed in.  The sculpture is about 8 inches tall.  Contrast is created in the smooth surface of the front and the textured surface of the back.  Also there is contrast created by the holes and the directions of the forms.
 The eye is drawn through Coral by the lines of the forms.  The right form moves left and back while the middle form comes forward and the left form creates a nice flowing s-shape.  The sculpture has a different view form every angle.

The intent of this piece was to create a simplification or a representation of something from the natural world.  Coral is an amazing organism that sustains so much life and comes in so many different shapes, sizes and colors.  
The biggest strength of Coral is the holes.  They create so much interest and texture.  This piece would be very different without the holes.  I think I could have made some of the forms a little but stronger.  Next time I would spend more time working on the shapes of the coral forms.  
 

LinkWithin

Related Posts Plugin for WordPress, Blogger...